Back to Transportation Manager Main Menu
Transportation
This is the main dashboard page, where users can see the details related to trip requests. After logging in to Transportation Manager, users will land on this page.
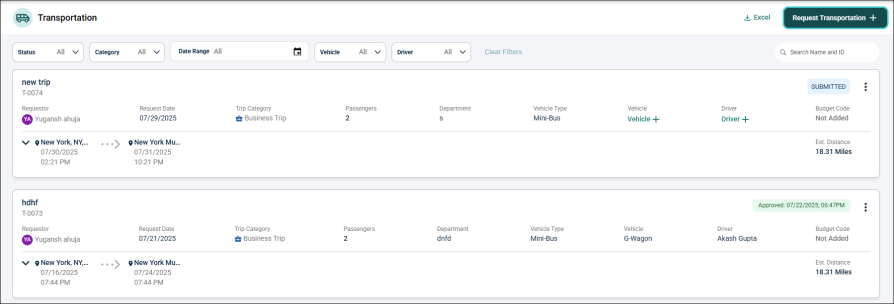
If users have added trip requests, they will be displayed here. Otherwise, this page will be blank.
How to Filter and Search for Trips
Filters
At the top of the page, a set of dropdown filters allows users to narrow down trip requests by Status, Category, Date Range, Vehicle, and Driver.

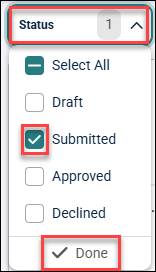
Status
The Status dropdown filter allows users to filter trip requests based on their current status.
-
Click the Status dropdown.
-
Check the boxes for Draft, Submitted, Approved, Cancelled, Declined trips options or use Select All to include all trips.
-
Click Done to apply filter.
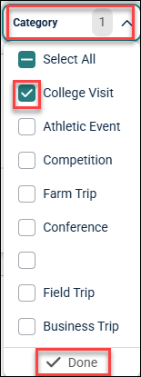
Category
The Category dropdown enables users to filter trip requests based on the category of the trip.
-
Click the Category dropdown.
-
Check the boxes next to the type of trip you want to filter or Select All.
-
Click Done to apply filter.
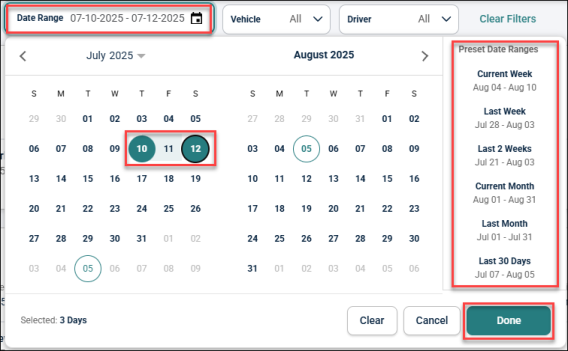
Date Range
The Date Range dropdown allows users to select a specific range of dates to display only the trip requests scheduled within that period.
-
Click the Date Range dropdown to get the calendar pop-up.
-
Select the date range manually or choose from the options given on the right side of the pop-up. This will highlight the dates in the Calendar.
-
Click Done to apply the filter.
-
You can also clear or cancel the selection using the Clear and Cancel buttons.
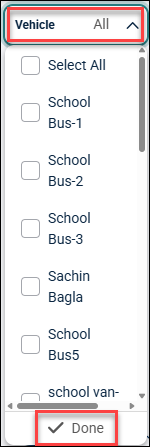
Vehicle
The Vehicle dropdown allows to filter trips according to the assigned vehicle or vehicle type.
-
Click the Vehicle dropdown.
-
Select the vehicle you want to view.
-
Click Done to apply the filter.
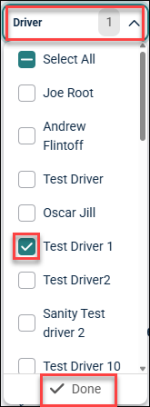
Driver
The Driver dropdown enables users to filter trip requests by driver, showing all trips assigned to a particular driver.
-
Click the Driver dropdown.
-
Select the drivers whose trips you want to view.
-
Click Done to apply filter.
Search
The search bar on the right side of the filters helps users search for trip requests by entering a trip name or ID.
Request Transportation
-
Click on Request Transportation button.

-
A new pop-up window appears, divided into three sections:
-
Details
-
Contact
-
Trips

-
Details
In the Details section, enter the following information:
-
Trip Name
-
Trip Category
-
Department
-
Number Of Passengers
-
Vehicle Type
-
Budget Code
-
Notes
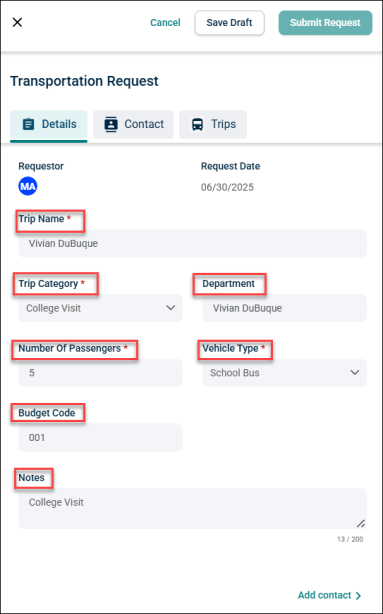
NOTE Users can save progress at any time by clicking Save Draft.
Contact
-
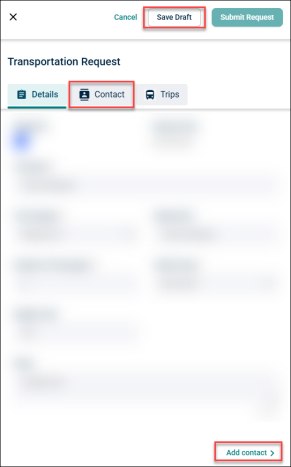
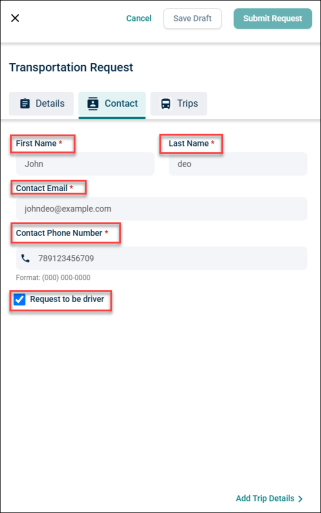
Click Add Contact at the bottom or click the Contact tab to access the section.
-
In the Contact section, enter the following information:
-
First Name
-
Last Name
-
Contact Email
-
Contact Phone Number
-
Request to be driver: Check this box if you want the requester to be a driver.
-
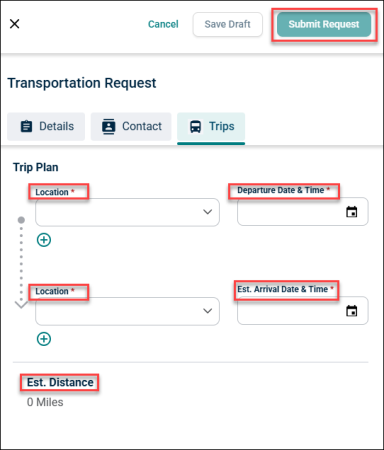
Trips
-
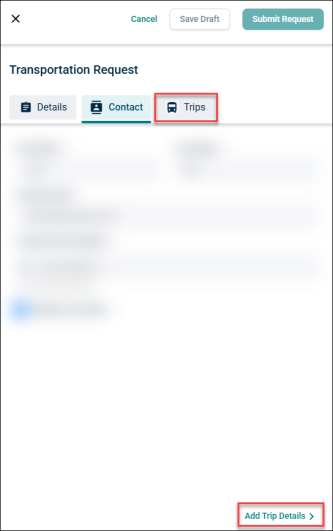
Click Add Trip Details at the bottom or click the Trips tab to access the section.
-
In the Trips section, enter the following information:
-
Location: Start typing the location and select the matching result from the drop-down list.
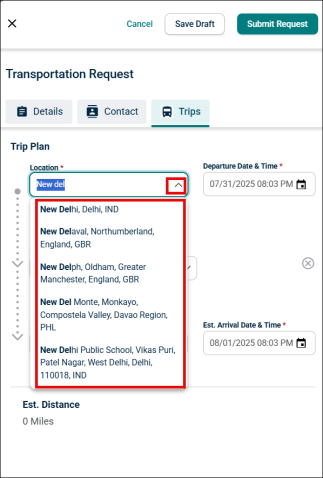
NOTE The trip plan defaults to a one-way trip. To add a round-trip, add another location using the (+) button, ensuring that the departure and arrival locations are the same. To add multiple stops, use the (+).
-
Departure Date & Time: Select start date and time and click Done.

-
Est. Arrival Date & Time: Select estimated arrival date and time and click Done.
NOTE Please ensure that the arrival time is not earlier than the departure time.
-
Est. Distance: Tool will automatically calculate the distance based on the starting and destination location.
-
Click Submit Request.
-
-
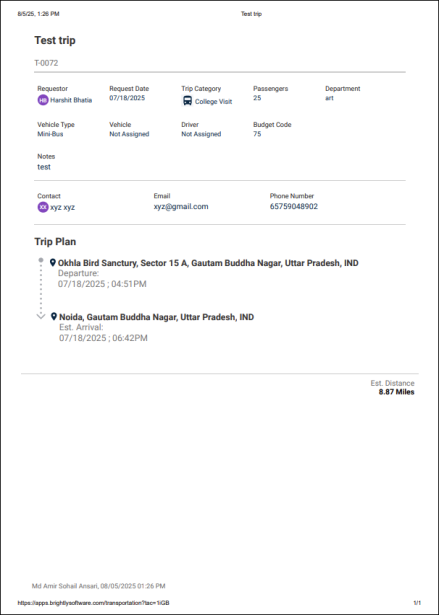
Once submitted, the request and all provided information will appear on the dashboard as individual trip card.

-
Each trip request card provides key information, including:
-
Trip name and ID
-
Requestor details
-
Request date and trip category
-
Number of passengers and department
-
Vehicle type, assigned vehicle, and driver
-
Budget code, estimated distance, and trip status (e.g., Approved, Submitted)
-
Route details, including pickup and drop-off locations and dates/times
-
Reviewing and Approving Requests (Admin)
-
Clicking anywhere on a trip request card opens a pop-up window, where the admin can Approve or Decline the request.
-
To approve a request, admin must enter the following information:
-
Assign Vehicle: Select a vehicle from the drop-down menu labelled "Available" or "Assigned".
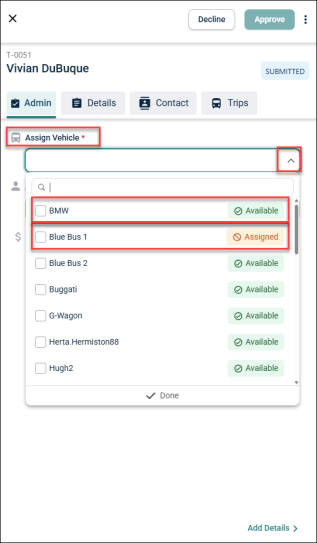
NOTE If a user selects a vehicle that is already assigned to another trip, update the existing trip to prevent double booking by following the same procedure described above. Users can also select multiple vehicles from the list.
-
Assign Driver: Select a driver from the drop-down menu labelled "Available" or "Assigned".
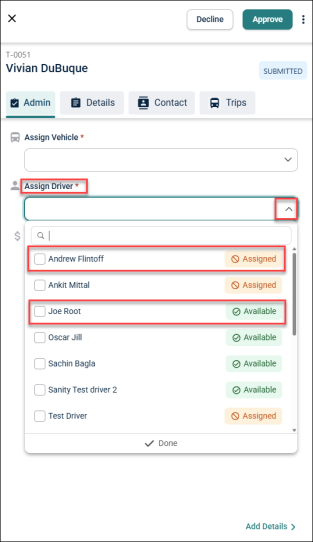
NOTE If a user selects a driver that is already assigned to another trip, update the existing trip to prevent double booking by following the same procedure described above. Users can also select multiple drivers from the list.
-
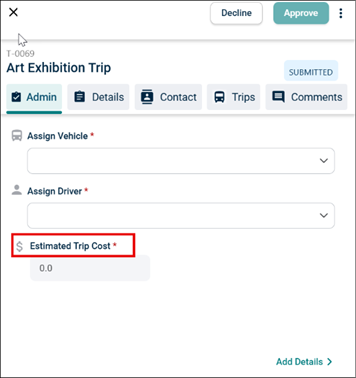
Estimated Trip Cost: Enter the estimated trip cost and click the Checkmark with solid fill.
-
Comments: The comment can be text or image as required. User can also edit and delete the comments.
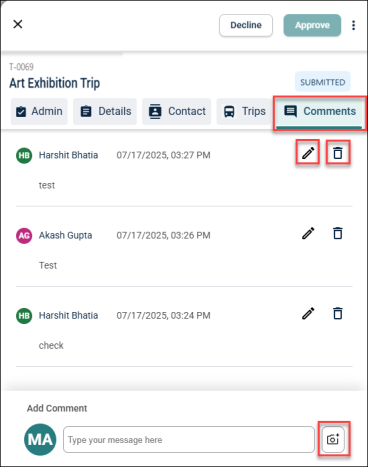
NOTE All users that have access to the trip will be able to see the comments.
-
-
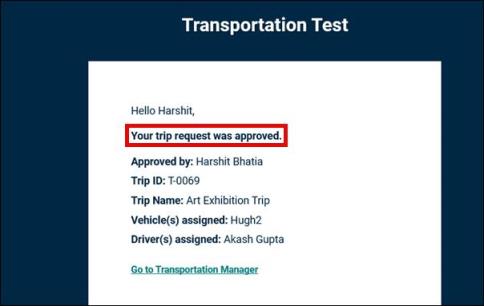
To approve a request, the admin can click the Approve button. The trip request will be approved, and a success notification will appear on the screen. The requestor will receive the following email:
-
To decline a request, the admin can click the Decline button, a popup window will appear where the admin can provide a reason for declining the request.
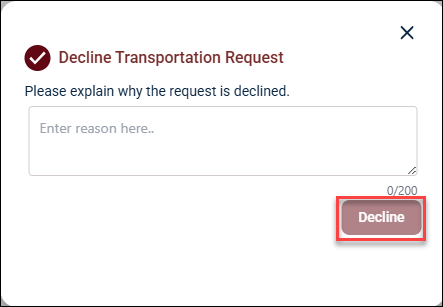
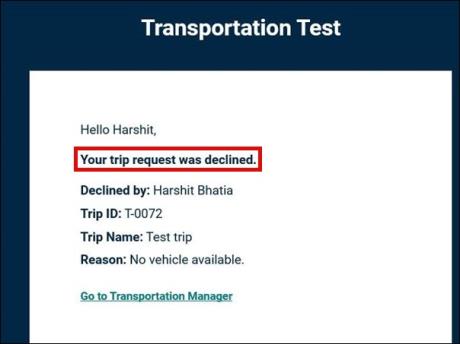
NOTE The decline reason will show in the status on the list page. The requestor will receive the following email:
Print Trip Request Details
-
Users can print the trip request by clicking the three vertical dots and selecting the Print option, allowing them to share the details as needed.

-
If the driver is not a user of the system, they will not have access to the trip request details. In such cases, the admin or requester can provide a hard copy as required.